For clubs For athletes Guide Pricing About Contact Support
← User guide Part 3 · Coaches

For coaches

A coach develops a group of athletes and helps run the range. You keep everything an athlete has for your own training, and gain a set of staff tools on top.

Your tabs are Today, Athletes, Schedule, Training and Finances. The day board, competitions, guests and the club's inventory are reached from Schedule. Club setup is owner-only.

Today

Today is your day rather than the club's. While one of your athletes is on a lane, a card at the top says who, which lane and what they are there to do. Then three figures: booking requests waiting, sessions to review, and what your athletes owe.

Below them, requests are answered in place, and Your day lists each booking with its lane and program, counting how many are done. A session with no program says so, with Set one beside it. Each figure opens the screen behind it.

Today for a coach on a desktop: three figures, booking requests answered in place, the day’s sessions and who needs you.
Today, in a desktop browser: the tabs become a labeled sidebar.

Who needs you

Who needs you lists the athletes worth a look today, most urgent first, with a sentence for each reason:

  • A review request that is still waiting.
  • Trigger snatching likely in their latest session, by the same check the insights use.
  • Scores slipping: their last three sessions at least a point per ten shots below their own usual.
  • Gone quiet: no session for two weeks, after training regularly.
  • Competing in the next seven days.

Tap an athlete to open them on the tab that answers the reason: their sessions for a review, their analytics for a slipping score. You see the athletes assigned to you; an owner sees the whole club.
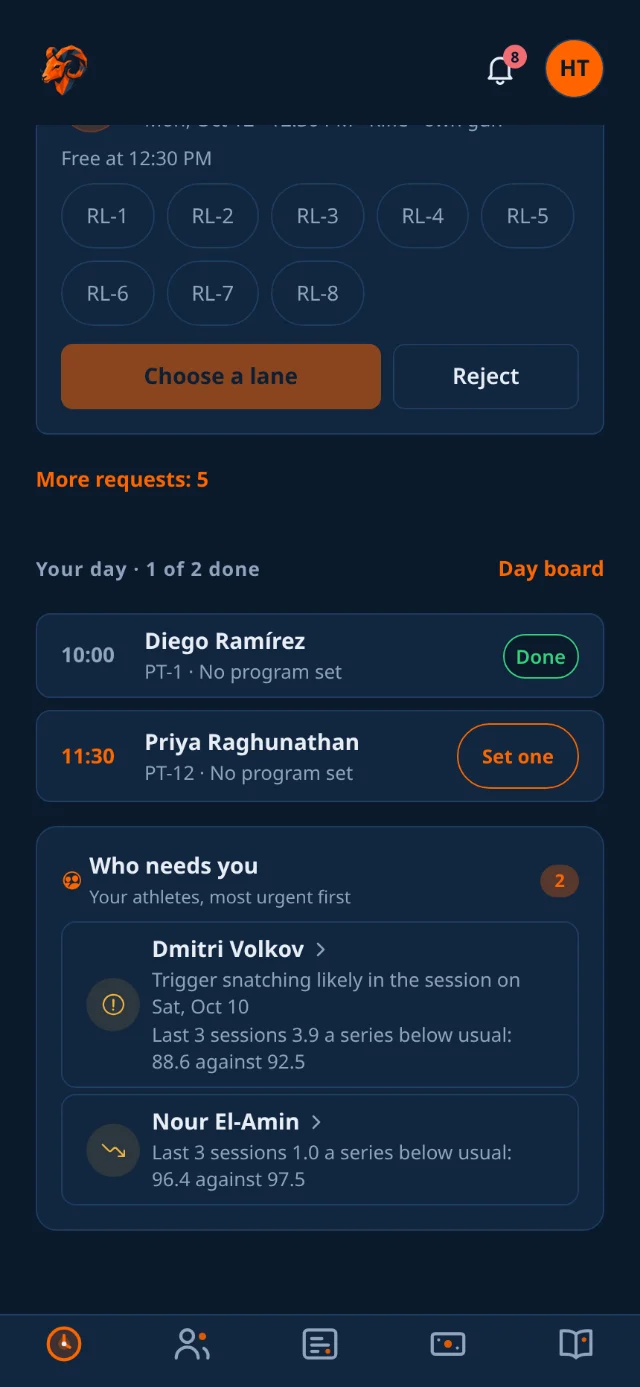
Who needs you on a phone: athletes ranked by urgency, each with the reasons in a sentence.
Who needs you, most urgent first.

Athletes: your roster

The Athletes tab opens on your own athletes, with the whole club one tap away. Search by name, or filter by status, category, team and coach.

Above the roster sit Invites, to bring somebody in, and Categories & teams, the labels you sort athletes into. Athletes join by invite and create their own account. A second segment lists the club's coaches.

Selecting an athlete lets you:

  • Assign an athlete's category, coach and team.
  • Toggle athletes as active or inactive.
  • Verify their shooting-club ID, confirming it on their profile.
  • Set competition eligibility. Only eligible athletes can enter competitions.
What a coach cannot change View an athlete's personal details. Editing these details or changing roles is restricted to owners. Roster placement is open to you.

You are notified about your athletes when they are assigned, book or cancel a session, request a review, need ID verification, or set a personal record.

The Athletes tab: the roster with search and filters, Invites and Categories & teams above it, and the selected athlete in a detail pane.
The roster: your athletes first, with search and filters.

Per-athlete analytics

An athlete's page opens on a summary and three tabs: Sessions, Analytics and Profile.

  1. Open Athletes and search for the athlete by name.
  2. Select the athlete, then choose the Analytics tab.
  3. Pick a period: latest session, last five sessions, last week, last month, last year, or all time.

The Overview toggle displays the dashboard the athlete sees, including match pressure, shots below 7, fatigue, consistency, technique radar, score trends, and a hit distribution on the athlete's own discipline's target.

It includes Goals against results: how each goal the athlete sets has moved the rating it is about, and what their score does in the sessions that carry it.

An athlete’s staff page with a summary and Sessions, Analytics and Profile tabs.
An athlete, opened from the roster.
Staff only

Athlete insights

Insights read the shape of an athlete's misses to name a likely cause and suggest a corrective drill.

  1. On the athlete's Analytics tab, switch from Overview to Insights.
  2. Read the findings by urgency: Needs work, Worth knowing, and Strength. On a laptop the list sits beside the finding you have open, with the chart it was drawn from.
  3. Each finding explains the data and suggests a concrete change for the next session.

The kinds of thing it reads:

  • Shots at 12 o'clock point to focus shifting from the front sight to the target; shots at 6 o'clock, to the rear sight.
  • Trigger snatching is a suspicion with its evidence: isolated shots far outside the athlete's own group, misses pulled low toward the trigger hand, and their own trigger rating. It is marked Possible or Likely and lists which clues are present.
  • Grip tension shows at 1 to 2 o'clock; shots at both ends of that diagonal point to a support position that is not repeating.
  • Plus the share of shots below 7, recovery after a bad shot, time-of-day patterns in your club's local time, and the direction of travel across the period. Every finding says how much shooting it rests on, and reads one discipline at a time.
What the athlete sees Athletes read the same report on their own Stats tab unless they switch it off, and their copy leads with a note that it does not replace you. It reads shot data and nothing else. You watch them shoot.
The Insights tab on an athlete: the findings listed by urgency, and the open finding, Signs of trigger snatching, with its evidence and a What to do line.
A finding, with its evidence and the action underneath it.

Session reviews

Session feedback requests land in your pending reviews.

  1. You get a notification, and the request appears in your list of pending reviews.
  2. Open it to review the session's target plot, shots, process ratings, and notes.
  3. The debrief also carries the goals the athlete set before the first shot and the fault and success chips they tapped on the line, in their own words. That is what the session was for, so your feedback can answer it rather than the score alone.
  4. Write your review and submit it.

The athlete is notified, and your feedback stays attached to the shots that prompted it, so it still makes sense when they read it again in six months.

Schedule and the day board

The Schedule tab manages day-to-day range activities.

  • The occupancy calendar has day, week and month views, displaying training blocks, open-range time and competitions.
  • Schedule overview: pick a date to see its bookings and free lanes.
  • Coaches can edit ranges, lanes and opening hours.
The club schedule calendar color-coded by occupancy.
The club timetable.

The day board

The day board is the one to have open at the counter. It is a grid of every lane against every hour for a single day.

  1. Filter to Pistol or Rifle lanes.
  2. Step through days with the arrows, or jump back with Today.
  3. Read the count of booked and free slots above the grid.
  4. Each filled cell identifies the lane occupant, distinguishing members, guests, and closed lanes.

Open a booking to change its gun, program or drills, or to Move it to another free cell. Requests waiting for a lane sit in a tray above the grid: tap Place and the lanes free at that hour light up.

The day board: a grid of lanes against hours with named bookings, and the requests still to place above it.
Every lane, every hour, one day.

Confirming bookings, and setting training

Booking requests

A requested slot holds its lane straight away and waits for staff to confirm it.

  1. Decide it on Today, where requests come first, or on the Day board, beside the lanes it concerns.
  2. Only lanes that are free at that time are offered. When one is free it is chosen for you; when several are, you pick. A club gun is chosen there if one was asked for. Or decline it.

The athlete is notified either way, so a rejection is never silent.
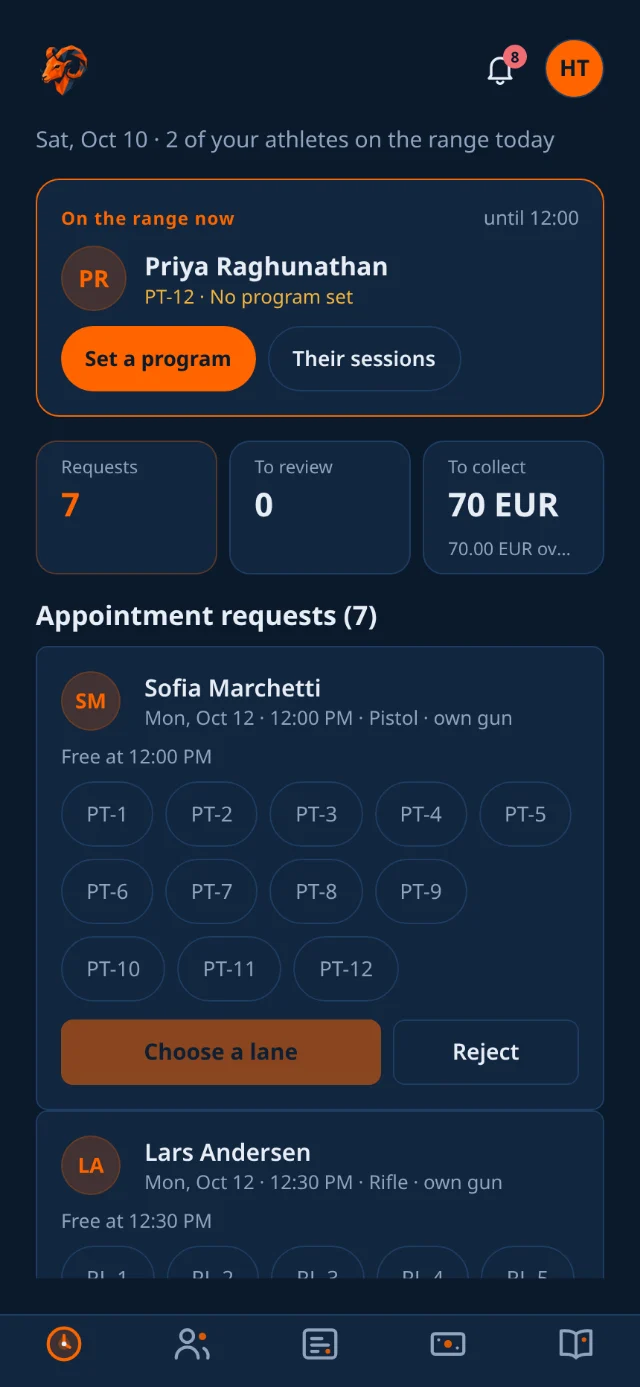
Today on a phone, with a booking request at the top ready to confirm or reject.
Requests waiting on you, at the top of Today.

Attaching a program or drills to a session

From a booked session on the Schedule you can send the athlete in knowing exactly what to work on.

  • Assign a training program to display the drill plan on an athlete's booking.
  • Assign specific drills for a slot. These appear as a checklist under the athlete's booking.

Guests and walk-ins

Someone turns up for a trial session with no app account. You can still put them on a real lane and hand them a club gun, exactly as you would a member.

  1. Open Guests from the Schedule tab, or add one while booking to capture details inline.
  2. Record who they are, then book them onto a lane like anyone else.
  3. Allocate a club gun if they do not have their own.

Guest bookings show on the day board in their own color, so at a glance you know which lanes hold people who may need watching.

The guests screen for booking walk-in and trial shooters.
Walk-ins, without an account.

Training: the club library

The Training tab holds the club's shared programs and drills for pistol and rifle.

It shows the library itself rather than links to it: sessions that still need a program, how much there is, the programs and drills most in use, and the drills by category. Tap anything to read it, or open the full editor.

The Training tab, showing the newest programs and the drills by category.
Programs and drills, in one tab.

Program library

Reusable drill plans. Each has a name, a discipline, a series count, shots per series, rest, and focus notes. Build one once and attach it to any booked session from the Schedule.

The training program library.
Reusable programs.

Drill library

Drills are categorized as pistol, rifle, physical, or mental.

  • Every club member can browse them.
  • Athletes tag the ones they actually ran in a session debrief.
  • You can assign specific drills to an athlete’s booked session from the Schedule.

Completing drills across all four categories earns the Well-Rounded badge.

The drill library grouped by pistol, rifle, physical and mental categories.
Drills, in four categories.

Finances: your athletes' fees

The Finances tab shows the fees of the athletes assigned to you.

  • It opens on who owes what, overdue first. Mark paid asks you to confirm and offers Undo; Assign fee is one form for one athlete or all of yours.

Owners see the whole club's ledger, set the fee plans and invoice in batches.

The Finances tab: who owes what, overdue first, with the form to assign a fee.
Fees for your athletes, coach view.

Inventory: the club's guns

Open Inventory from the Schedule tab. The owner manages the list; you see the same screen, read-only.

  • Guns and cylinders, with compliance pills that flag a cylinder close to its expiry or a gun due for service.
  • Fleet analytics: active guns, how often each is assigned, and a needs-attention list.
  • Equipment Logs, at the top: a dated record for each club gun of cleaning, cylinder checks and repairs. Add an entry whenever work is done.
The club's gun inventory as a coach sees it: guns by type, read-only, with the Equipment Logs link at the top.
The club's guns, coach view.

Running a competition

Competitions, opened from the Schedule tab, is a hub of New, Ongoing and Past. Create the competition here; managing participants happens on the competition's screen to keep this one fast.

Create it and add participants

  1. From Competitions, create a new competition with its date and details.
  2. Open it and add athletes with the name search. Only competition eligible athletes can be added.
  3. Set each category, gun, lane and score.
  4. Each entry goes out as an invitation the athlete accepts or declines.

The scoreboard updates live as scores go in.

The competitions hub with new, ongoing and past competitions.
New, ongoing and past.

The competition workspace

Opening a competition gives you its own screen, and this is where the event is actually run: the participant list with each shooter’s category, gun, lane and score, the seeder, and the live scoreboard. Everything heavy lives here rather than on the hub, which is what keeps the hub quick when the club has a long history of events behind it.

A competition's own workspace with participants, lanes, guns and the scoreboard.
One competition, everything in one place.

The 1-click relay and lane seeder

Building a start list by hand is the slowest part of running a club match. The seeder does the whole thing from the competition screen.

  1. Under 1-Click Relay & Lane Seeder, tap Seed Relays. Participants are sorted by qualification score.
  2. Choose Lanes per relay. It defaults to your range capacity. Shooters are mapped to real firing-point names.
  3. Read the generated start list: shooters divided into sequential relays with 75-minute match windows, for example Relay #1 at 09:00 and Relay #2 at 10:15.
  4. Check the weapon assignment. Athletes with a personal weapon are marked. For others, the seeder finds their most used club gun.
  5. Tap Apply Seeding & Weapons and confirm. Lane and weapon assignments are pushed to the scoreboard.
Tip Nothing is written until you confirm, so you can seed, look at the result, change the lanes-per-relay and seed again as many times as you like.
The 1-click relay and lane seeder with lanes-per-relay options and generated relays.
Relays, lanes and guns, from one tap.

Your app settings

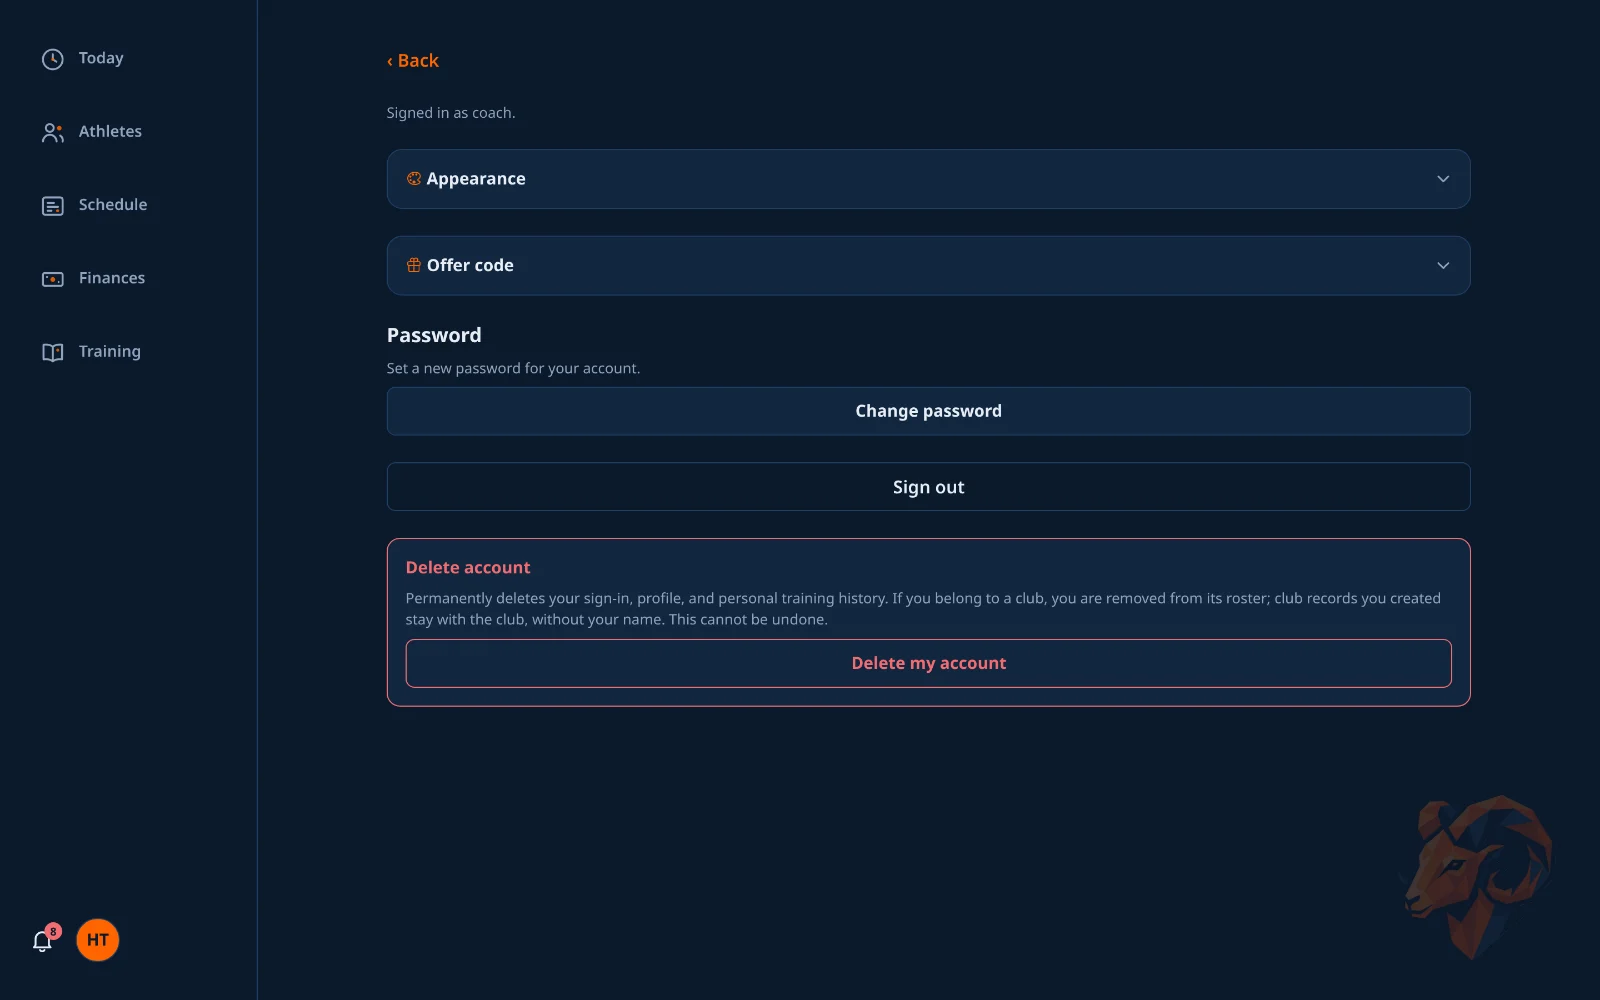
Reached from your avatar in the header. Coaches get the same appearance and offer-code controls as everyone else.
What is here

  • Appearance: twelve themes or System.
  • Offer code: redeem a code and read your redemption history.
  • Password and account deletion.
  • On a tablet or a desktop the bell and your avatar sit at the foot of the left sidebar rather than in a header.
Staff settings on a desktop layout, with appearance and offer code sections.
The staff settings screen.